Testing with Respondus LockDown Browser

What is it?

Respondus LockDown Browser provides a more secure environment for online testing. LockDown Browser itself is a separate web browser (like Internet Explorer, Firefox, or Chrome) specifically geared toward taking online tests. When a student is ready to take an online test that uses LockDown Browser, they actually launch the LockDown Browser from their desktop instead of launching their usual browser of choice. LockDown Browser then fills the student’s screen (including any additional displays), open to Detroit Mercy’s Knowledge login page. While LockDown Browser is running, students are unable to use their computers for anything other than taking the test. They cannot surf other web sites, use chat services, screen capture / record, look at PDFs, PowerPoint decks, or Word files, etc.

How to use Respondus LockDown Browser

01. Have your students download and install the LockDown Browser

The Detroit Mercy LockDown Browser can be downloaded from the following URL:

http://www.respondus.com/lockdown/download.php?id=945835138

The LockDown Browser that students can get from this location is unique to the University of Detroit Mercy (when launched it only opens our Knowledge login page). Download and installation instructions can be found on that page.

02. Set up your Blackboard test and add it to a content area as you normally would

IDS still recommends you use question pools and random blocks to provide each student with a unique test. Remember, if you would rather not use Blackboard’s test creation tools, IDS can convert a Word (or RTF) file to an online test for you, provided you follow the appropriate formatting guidelines. If you need help adding your test to a content area, see this walkthrough.

NOTE: Do not set the following options when deploying your test:

  • Open Test in a New Window,
  • Require a password,
  • Password

These options will be set by Respondus LockDown Browser.

03. Turn on Respondus LockDown Browser for your test

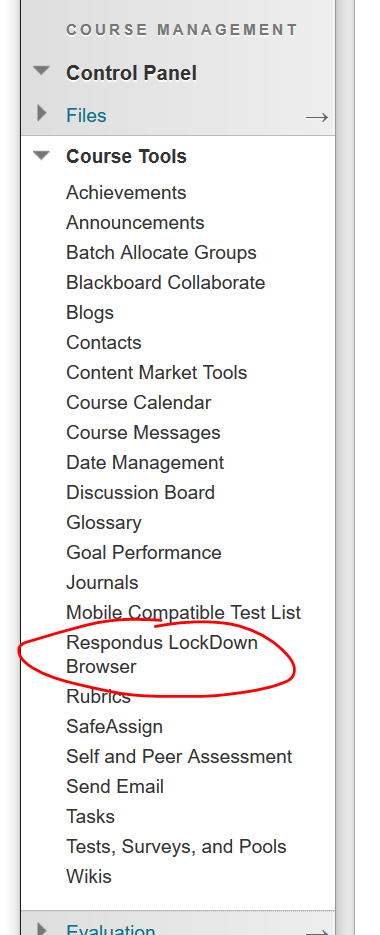
3.1 Click RESPONDUS LOCKDOWN BROWSER under the Course Management / Course Tools heading to launch the LockDown Browser Dashboard.

RLDB-from menu 
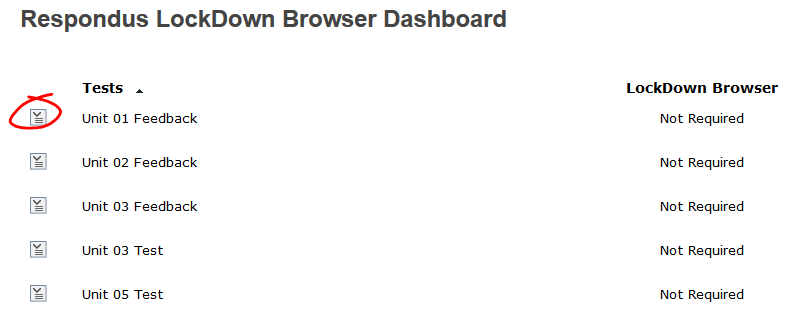
3.2 On the dashboard you’ll see a list of all the tests & surveys currently deployed to content areas of the course (whether they are available or not). To require LockDown Browser for an assessment, click the button that appears to the left of the assessment name.

dashboard

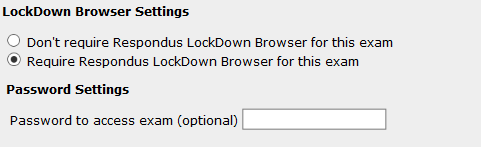
3.3 To use LockDown Browser for an exam, choose the “Require Respondus LockDown Browser for this exam” option. If you would like to set a password for a test, you may do so here.

basics

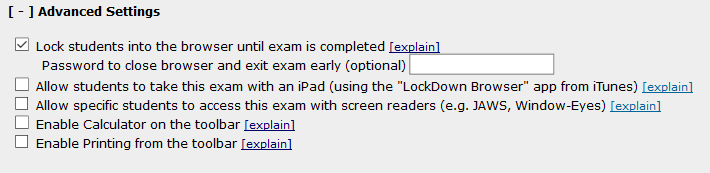
3.4 Specify the advanced settings you wish to use with the exam. For most courses, the default settings (nothing checked) will be usually be sufficient.

advanced-settings

Click SAVE AND CLOSE to finish the activation process.

Caveats

The equation editor is not available for providing responses while using Respondus Lockdown Browser.

Download Respondus Lockdown Browser

If you plan to use Respondus Lockdown Browser for testing in your Blackboard course site, students will need to download the Lockdown Browser prior to taking the test.

Respondus LockDown Browser uses a standard Windows or Mac installer that can be downloaded by faculty or students from the following link (note: this link is unique to Detroit Mercy):

http://www.respondus.com/lockdown/download.php?id=945835138

Allowing additional submissions

From time to time a student will have an issue turning in a test or assignment and you’ll want to give them another opportunity to submit their work. If you’ve set up the test or assignment for single attempt (or if they’ve used up the multiple attempts you’ve alloted), you’ll need to let Blackboard know the student can submit one more time. Fortunately, the process for clearing an attempt is straightforward.

First, locate the table cell in the Grade Center for the attempt you wish to clear. Click the OPTIONS button (which appears when you hover your mouse pointer over the cell) and choose View Grade Details.

view details

Beneath the From here you have a few options. Beneath the current grade information, you’ll find a list of all the student’s attempts.

attempts

Here’s where you have some options.

1. The Fast and Easy Option

Click ALLOW ADDITIONAL ATTEMPT. The current attempt information will be saved (which may be helpful, especially if you want to refer back to the old draft or keep any grade feedback you’ve provided), but the student will be allowed to resubmit. If you’re doing anything fancy with grading (e.g., you’re scoring using the average of all graded attempts), you may want to consider one of the other options ….

IGNORE ATTEMPT keeps this attempt’s information, but removes from the attempt tally. So the grade for this attempt won’t be factored into an average of all attempts.

CLEAR ATTEMPT deletes the attempt from the system entirely. The student’s submission, and any feedback you’ve provided, will be deleted in the process.

Creating an Assignment

In this tutorial, we will walk through the process of creating an assignment in your Blackboard course. To start, first go into a content area where you wish to make an assignment available to your students. Mouse over the “Assessments” button toward the top of the body of the page and select “Assignment”.

creating_an_assignment1

Next, type in the assignment name along with any instructions you may have for your students. Adding a due date into the set of instructions helps to eliminate any confusion as to when an assignment is due since it’s part of the instructions, but of course is up to you.

creating_an_assignment2

If you have any files to attach for your students to review or work off of, you may add them by clicking on the “Browse My Computer” button. Or if’ you’ve already uploaded it to your course, click “Browse Course”

creating_an_assignment3

Next you have the option to add a due date.

creating_an_assignment4

Make sure to put in a point value for this assignment. This is a mandatory field.

creating_an_assignment5

If you are using a rubric to grade your assignment, you may add it by clicking on the “Add Rubric” button. If you would like to learn how to utilize Rubrics in Blackboard, please check out this tutorial on Rubrics in Blackboard.

creating_an_assignment6

From here, there’s additional options in the next 3 categories. You can view what’s in each category by clicking the title to expand the options. Generally speaking, the default settings are usually set appropriately, but you may wish to change some of them depending on your needs.

creating_an_assignment7

Under Submission Details, you can leave the default assignment type as individual submission, or change the assignment to a group submission, and also allow more than one attempt. NOTE: Allowing multiple submissions adds additional attempts in the grade center that will need your attention. More on the Plagiarism checker here.

creating_an_assignment8

Group Submission

When selecting the Group Submission option, you will have a choice to select the group(s) to assign the assignment to. NOTE: You will need to have groups already created in the course before you can use this feature.

group_assignment1

Next, click the group(s), then click the top arrow to move your selection over to the “Selected Items” section.

group_assignment2

Under Grading Options, you can turn on anonymous grading if you wish. You may also set the assignment to allow peer to peer grading by checking the “Enable Delegated Grading” option. creating_an_assignment9

Under Display of Grades, you can change the primary and secondary score (this can also be done in the Grade Center) from the default. You may also decide this assignment is a practice, so you may wish to uncheck the “Include in grade center grading calculations” option. Generally speaking, it’s a good idea to leave it checked as the default. You may also make the score unavailable to your students by unchecking the “show to students in my grades”. If you wish to show the statistics for the assignment to your students, check the third option.

creating_an_assignment10
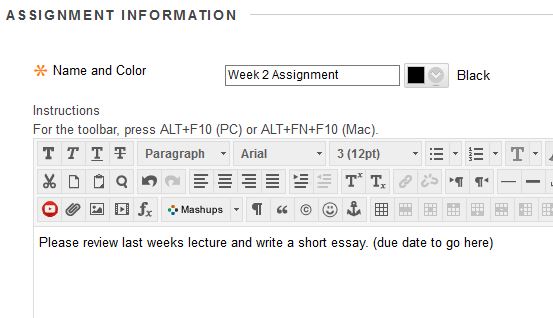
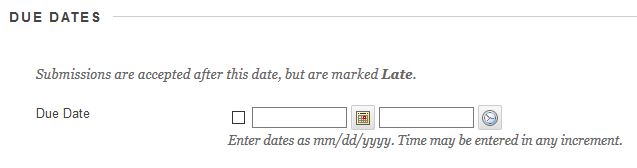
You may wish to limit when your students have access to the assignment. Maybe you are setting up your class for future weeks, or wish to grant them access for a specific time frame for that week. You may do so by selecting a date and time range, just click on the calendar and/or clock icon to set the date and time. Make sure there’s a check in the appropriate display after / display until field(s) if you wish to limit the availability. If you leave it blank, the assignment will be open until you turn it off manually. You may also track the number of views for this assignment by checking the track number of views option.

creating_an_assignment11
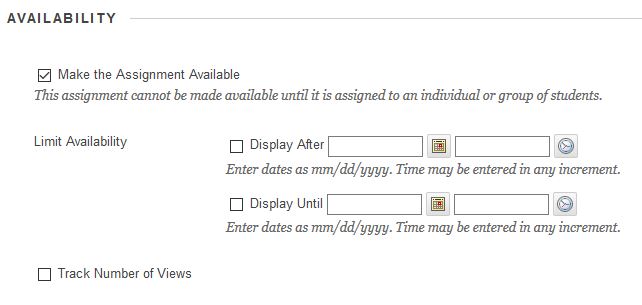
When your finished, click the submit button.

profile7

Create a Survey From a Pool of Questions

If you’re using the IDS provided template, you’re probably considering providing the students with an opportunity to give you feedback on their experience of the course while the course is in progress.

IDS has added a number of course and unit evaluation questions to the template in question pools. Selecting which questions you’d like to use and adding them to a survey is easy.

First you’ll need to create your survey. Choose TESTS SURVEYS AND POOLS from the Course Tools heading.

tests-surveys-pools-menu

Then choose SURVEYS, then click the BUILD SURVEY button to create a new survey.

build-survey

Name and provide a description and instructions for your survey as necessary, then click SUBMIT. While you’ll note you can create questions here on the survey canvas, just as you can create questions on the test canvas, we’ll be adding questions from a pool, so click FIND QUESTIONS.

survey-find-questions-button

Select the pool you want to add questions from (or choose ALL POOLS to view and pull questions from all question pools in the course).

survey-select-pool

Once you have your pool selected, you’ll be presented with a preview of the questions available to add. To view the full question text, point to the QUESTION DISPLAY button and choose FULL TEXT.

You also have the option to copy the question into your survey or link the question. If you choose to link the question, then any changes made to the question in the pool will be reflected in the survey (and in all other linked instances of the question).

If you choose to copy the question, then edits made on the survey instance won’t appear in the question pool and vice versa.

question-display-select

Check the boxes for the questions you wish to add, then click SUBMIT.

You can now re-order your questions by click-dragging them up or down, or by using the re-order button in the upper right of the test canvas.

reorder-questions

 Once you have all your questions added, use the same process to deploy your survey as you’d use to deploy a test.

Page 4 of 30...23456...102030...