Author Archives: Russell Davidson

Optimize video for online delivery using Handbrake

If you’ve used your phone, tablet, or digital camera to record video for your students to watch, you may find the resulting files large and take forever to upload. This means they’ll also take a long time for your students to download. Fortunately, you can pretty easily optimize your video using the free software HandBrake.

First, you’ll need to download and install HandBrake. Go to https://handbrake.fr/downloads.php to get the latest version that’s appropriate for your computer. We’ll be using the Windows version in this example.

Handbrake gives you the option to optimize one file at a time, or a number of files at once. If you’d like to run a number of files together, put them all in a folder before you get started.

Now launch HandBrake.

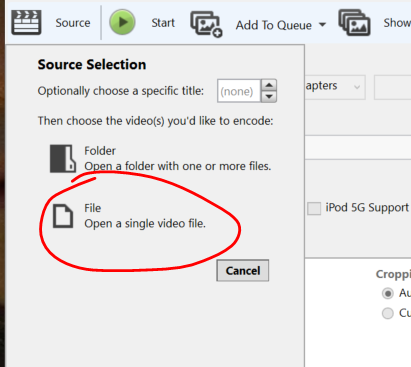
First we need to select the file or files. Click the SOURCE button.

Source

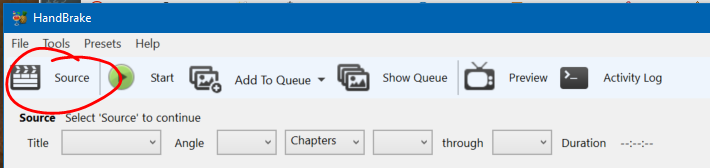
If you’ve put a bunch of files into a folder, choose FOLDER. For this example, we’ll be optimizing a single file, so we’ll choose file, locate our file in the browser, and click OPEN.

single-file

It may take a minute or two to scan your file or files, depending on how large the file(s) are (and how many you’re doing in a single sitting).

Now, click BROWSE on the Destination line to pick where you’re going to save the file and what name you’re going to save it under.

destination

Under OUTPUT SETTINGS, make sure the MP4 is selected as the container. Click the WEB OPTIMIZED checkbox.

output

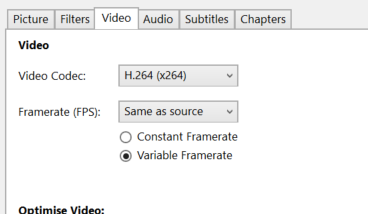
On the VIDEO tab, make sure the H.264 (x264) is selected as the Video Codec.

Video

Finally, click START to begin the process. Depending on the size of the video file(s), the process may take quite a while to run. Be patient.

Once the process is complete, you should have a significantly smaller video file to upload.

Motivating students through course gamification and blackboard tools

Presentation Resources

Presentation slides (PDF)

Sample Syllabus / Schedule (PDF)

References

Gameful Pedaogy by GradeCraft

Boskic, N., & Hu, S. (2015). Gamification in Higher Education: How we Changed Roles. Proceedings Of The European Conference On Games Based Learning, 1741-748.

Cózar-Gutiérrez, R., & Sáez-López, J. (2016). Game-based learning and gamification in initial teacher training in the social sciences: an experiment with MinecraftEdu. International Journal Of Educational Technology In Higher Education, 13(1), 1-11. doi:10.1186/s41239-016-0003-4

Erenli, K. (2013). The Impact of Gamification. International Journal Of Emerging Technologies In Learning, 15-21. doi:10.3991/ijet.v8iS1.2320

Faiella, F., & Ricciardi, M. (2015). GAMIFICATION AND LEARNING: A REVIEW OF ISSUES AND RESEARCH. Journal Of E-Learning & Knowledge Society, 11(3), 13-21.

Rule, R. (2016). Workshop- Gamification: a Hands-on Session to Explore this Motivational Technique. https://community.blackboard.com/docs/DOC-2136-workshop-gamification-a-hands-on-session-to-explore-this-motivational-technique

Journals, Blogs, Discussion, Wikis … What’s the difference? (And which to use when)

Blackboard’s suite of asynchronous social tools — Journals, Blogs, Discussion, and Wikis — provide students with different methods of sharing and recording their thoughts. Each tool functions very differently, and it’s important you match the right tool to the right assignment.


Journals

Journal posts are generally only visible to the student who made them (and to the course faculty).

journal

Journals are good for self-reflection exercises, stream of consciousness free-writing, and personal activity logs.


Blogs

Blog posts are generally made by one student (who may be the representative of a group, depending on the assignment), then read by the rest of the class. The readership may then comment on the blog post, but blogs are generally not designed for more back-and-forth interaction.

blog

In his Chronicle of Higher Education article A Better Blogging Assignment, Mark Sample proposes the following assignment:

Each student will contribute to the weekly class blog, posting an approximately 200-300 word response to the week’s readings. There are a number of ways to approach these open-ended posts: consider the reading in relation to its historical or theoretical context; write about an aspect of the day’s reading that you don’t understand, or something that jars you; formulate an insightful question or two about the reading and then attempt to answer your own questions; or respond to another student’s post, building upon it, disagreeing with it, or re-thinking it.


Discussion

Online discussion is the most interactive of these tools. In an online discussion, students post, then read and reply other students’ posts.

discussion

Discussion is a good place to get students interacting. While the name suggests discussion assignments mimic in-class discussion, discussion board posts are really more like mini-essays (how mini depending on the parameters you set). Students can then provide feedback (reply), both to the initial post and to other replies. Discussion is an excellent tool for getting students interacting with each other, as opposed to a blog, where the communication is largely one way (writer to audience, with minimal audience commentary).


Wikis

Students can use a Wiki to collaboratively create a document or set of pages. Change history is logged, so you can look back and see which students made what changes when.wiki

Wikis are an extremely versatile tool can be used at any time you want students to work together to develop a single document. A simple wiki assignment is the scavenger hunt (sometimes less thrillingly called a lit review): Students are tasked with collecting resources on a given topic — journal articles, books, web sites — then post their findings to a wiki. At the end of the project, the students will have collaboratively produced a single document with a wide array of helpful resources on your given topic.

Student groups may also use a wiki to collaboratively create learning modules modules for their peers.

Testing with Respondus LockDown Browser

What is it?

Respondus LockDown Browser provides a more secure environment for online testing. LockDown Browser itself is a separate web browser (like Internet Explorer, Firefox, or Chrome) specifically geared toward taking online tests. When a student is ready to take an online test that uses LockDown Browser, they actually launch the LockDown Browser from their desktop instead of launching their usual browser of choice. LockDown Browser then fills the student’s screen (including any additional displays), open to Detroit Mercy’s Knowledge login page. While LockDown Browser is running, students are unable to use their computers for anything other than taking the test. They cannot surf other web sites, use chat services, screen capture / record, look at PDFs, PowerPoint decks, or Word files, etc.

How to use Respondus LockDown Browser

01. Have your students download and install the LockDown Browser

The Detroit Mercy LockDown Browser can be downloaded from the following URL:

http://www.respondus.com/lockdown/download.php?id=945835138

The LockDown Browser that students can get from this location is unique to the University of Detroit Mercy (when launched it only opens our Knowledge login page). Download and installation instructions can be found on that page.

02. Set up your Blackboard test and add it to a content area as you normally would

IDS still recommends you use question pools and random blocks to provide each student with a unique test. Remember, if you would rather not use Blackboard’s test creation tools, IDS can convert a Word (or RTF) file to an online test for you, provided you follow the appropriate formatting guidelines. If you need help adding your test to a content area, see this walkthrough.

NOTE: Do not set the following options when deploying your test:

  • Open Test in a New Window,
  • Require a password,
  • Password

These options will be set by Respondus LockDown Browser.

03. Turn on Respondus LockDown Browser for your test

3.1 Click RESPONDUS LOCKDOWN BROWSER under the Course Management / Course Tools heading to launch the LockDown Browser Dashboard.

RLDB-from menu 
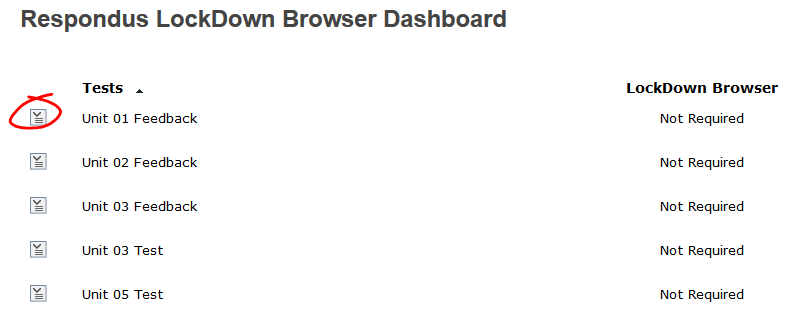
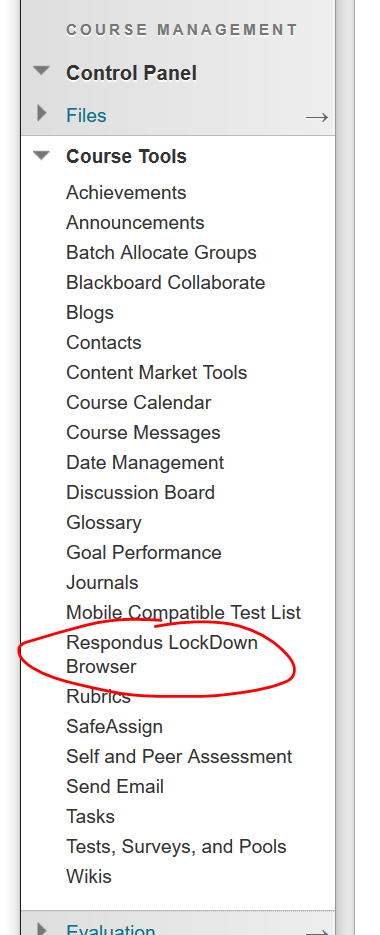
3.2 On the dashboard you’ll see a list of all the tests & surveys currently deployed to content areas of the course (whether they are available or not). To require LockDown Browser for an assessment, click the button that appears to the left of the assessment name.

dashboard

3.3 To use LockDown Browser for an exam, choose the “Require Respondus LockDown Browser for this exam” option. If you would like to set a password for a test, you may do so here.

basics

3.4 Specify the advanced settings you wish to use with the exam. For most courses, the default settings (nothing checked) will be usually be sufficient.

advanced-settings

Click SAVE AND CLOSE to finish the activation process.

Caveats

The equation editor is not available for providing responses while using Respondus Lockdown Browser.

Download Respondus Lockdown Browser

If you plan to use Respondus Lockdown Browser for testing in your Blackboard course site, students will need to download the Lockdown Browser prior to taking the test.

Respondus LockDown Browser uses a standard Windows or Mac installer that can be downloaded by faculty or students from the following link (note: this link is unique to Detroit Mercy):

http://www.respondus.com/lockdown/download.php?id=945835138

Page 1 of 1912345...10...