Setting Up a Back-Up Collaborate Room
Though UDM’s Blackboard course site has proven extremely reliable over the last several years, it’s never a bad idea to be prepared for the worst. If you’re concerned that a Blackboard outage may affect your students’ ability to attend a synchronous Collaborate session, this post will walk you through the steps necessary to create a back-up Collaborate room which you can invite your students to in case of a Blackboard or campus internet outage.
Before we get started, let’s talk briefly about when setting up a space like this is a good idea.
IDS recommend using this as a backup only in cases when a synchronous session absolutely cannot be cancelled or delayed in the event of an outage. Why? Because UDM’s Blackboard Collaborate license limits the number of sessions UDM can run simultaneously. If every class taught online ran a backup session as well, we would not have any sessions left in our license to run the regular online classes. So while this process is useful as backup, please be judicious in its application.
Back up your students’ email addresses
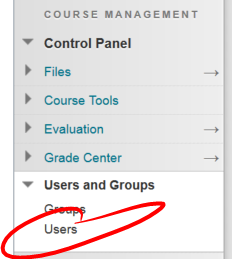
First, you’ll want to back up your students’ email addresses. Do do this in Blackboard, click USERS under the USERS AND GROUPS heading.
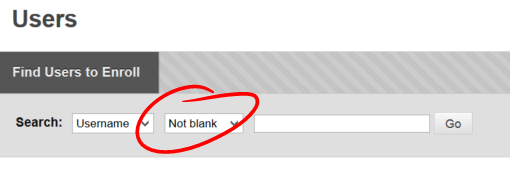
To ensure all students are displayed, make sure NOT BLANK is selected in the search pull down list.
The fastest way to copy email addresses is to hold the control key (CTRL) on your keyboard and click near but not on the the students’ email addresses. By doing this, you’re clicking on (and selecting) the table cell that contains the email address. Once you’ve selected all the email addresses on a page, you can paste those cells into a Word, Excel, or Notepad file. Save this file with an appropriate name (e.g., CRSE1000-01 Backup) and set it aside, we’ll need it again in a minute.
Name and schedule your back-up Collaborate session
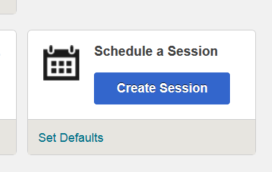
Next you’ll need to set up your backup Collaborate session. Under the COURSE TOOLS heading, choose COLLABORATE, then click the CREATE SESSION button.
Label your room in a way that will identify it as a back-up, and not the primary room (to work as a backup, this room will need to be set so all users join as moderators, a setting you probably won’t want for your usual room). For this example, we’ll be using the name Back-up (Blackboard Outage) Room.
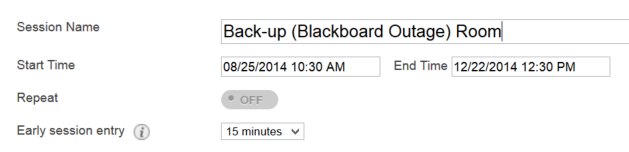
To ensure our room is available any time Blackboard might go down, we’ll set this session to run the duration of the course. Unfortunately, you cannot set up a repeating session for your back up room — each repetition of the room is a separate instance and therefore has it’s own guest link (which we’ll use to access the room in case of emergency). Remember, when scheduling a room, both the start and end times have to be in the future AND be set in 15 minute increments (times ending :00, :15, :30, :45).
Need a backup for more than one of your courses?
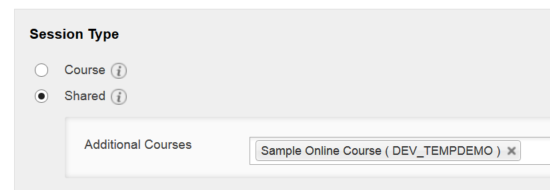
You can use one backup session for all the courses you teach on Knowledge. If you need a backup for multiple courses, just click the SESSION TYPE heading and choose SHARED. Then use the ADDITIONAL COURSES drop-down list to choose all the courses you’ll want to use this session in as a backup.
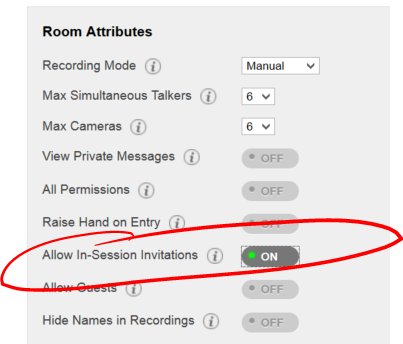
Enable In-Session Invitations
To get your students into the room without having access to the course site, we’ll need to allow in-session invitations. To enable this feature, click ROOM ATTRIBUTES to open the Room Attributes menu, then click the OFF button on the Allow In-Session Invitations line, switching it to on.
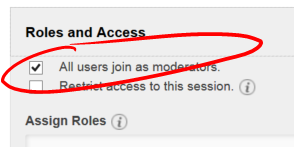
Roles and Access
Usually, Collaborate uses account information from Blackboard to determine whether or not a user should be a room moderator. As a result, without the link to Blackboard Collaborate will have no way of telling who should have moderator rights. And with no one acting as moderator, there will be no way to enable the rights to access the whiteboard, turn on voice chat, web camera, etc. To get around this issue, we’ll need to give anyone who joins the room moderator rights. While this may result in a slightly chaotic session (depending on the demeanor of your class), it’s better than no session at all.
To make sure anyone who enters the room has moderator rights, click ROLES AND ACCESS to open the menu, and check the All users join as moderators box. Then SAVE your session.
If you really don’t want to allow all members to have moderator rights, you can instead choose ALL PERMISSIONS under ROOM ATTRIBUTES. This will allow all users access to voice chat, the whiteboard, and video, but won’t allow you to do things like turn on and off recording.
Get and save room link
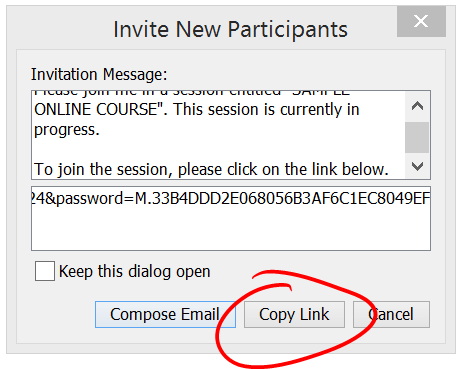
Last, we’ll want to get the link that would get sent out to in-session invitees. To do this, we’ll need to launch our Collaborate session. Once the session is up and running, click the menu button at the top-right of the PARTICIPANTS panel and choose INVITE PARTICIPANTS.
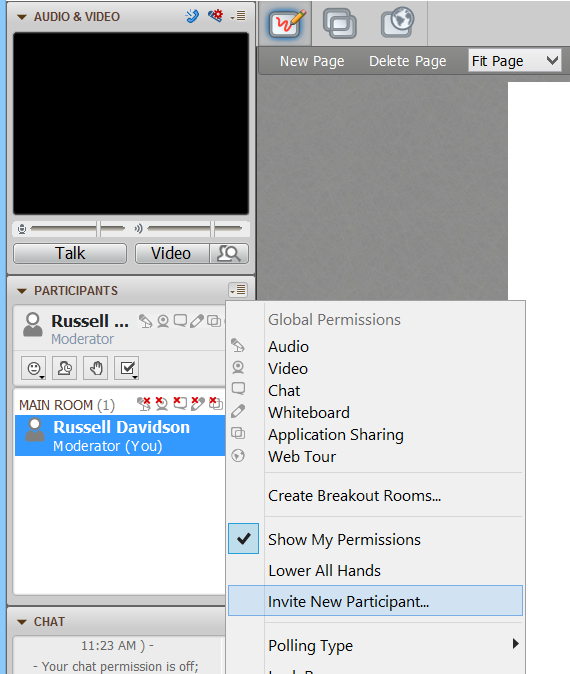
This will pop open a window with invitation content that could be emailed to prospective guests. Click the COPY LINK button, then open that file we created earlier containing the email addresses of all your students and paste in the link.
Now, should you need to get the class together for a synchronous session at a time when Blackboard is unavailable, you can open this file and email this url out to all your students.
Shortlink for this post: http://ids.commons.udmercy.edu/?p=1154

